


So, first things first, let me tell you a brief about Node.js. Node.js is the JavaScript runtime which is based on Google’s V8 Engine i.e, with the help of Node.js we can run the JavaScript outside of the browser, which is typically we cannot. Other things you may or may not have read about Node.js is that it is single-threaded, based on event-driven architecture, and non-blocking based on the I/O model and I will explain to you each and every part in this story.
1) Node.js Architecture Node.js, as you have already read in the previous paragraph, is made of Chrome V8 engine which is written in C++ and Libuv which is a multi-platform C library that provides support for asynchronous I/O based events on event loops and thread loops. Don’t worry I explain this later in this story. An important thing we need to remember is that, even though Node.js is made using the V8 engine and Libuv which are written in C or C++, we can still use Node.js in pure JavaScript.
2) Node.js Application So now that, we have learned about the Node.js architecture, it’s time to learn how a Node.js application runs and this part includes the concept of Node.js being single-threaded and its non-blocking nature as well. So, first of all, what is a thread? A thread in simple terms is basically a set of programming instructions that can be run independently in a computer’s processor and every process that we want to run has its own thread to run the programming instructions and the process can have more than one thread. But, the point to remember is, Node.js application runs only on a single thread and by that, I mean whether that Node.js application is being used by 5 users or 5 million users, it will only run on a single thread which makes the Node.js application blockable (which means that a single line of code can block the whole app because an only single thread is being used). So, to keep the Node.js application running, asynchronous code must be used everywhere having callback functions because as we know that asynchronous code keeps on running in the background and the callback gets executed as soon as the promise gets resolved rather than synchronous code which blocks the whole application until it gets finished executing. But, we can still use synchronous code however at someplace in our application and that place is before our application enters Event-loop. Event-loop is what allows Node.js applications to run non-blocking asynchronous I/O based operations i.e, all the asynchronous code is managed and executed within the event-loop and before that, we can use our synchronous code which is in this case known as Top-Level code. So, try to write synchronous code only for those operations which are executed only once at the start of our application and not every time, for eg: reading some data from your computer memory which later can be requested by some user (many times) in asynchronous code. So, let me show you a chart visualizing all this and after that, I will explain some other points as well.
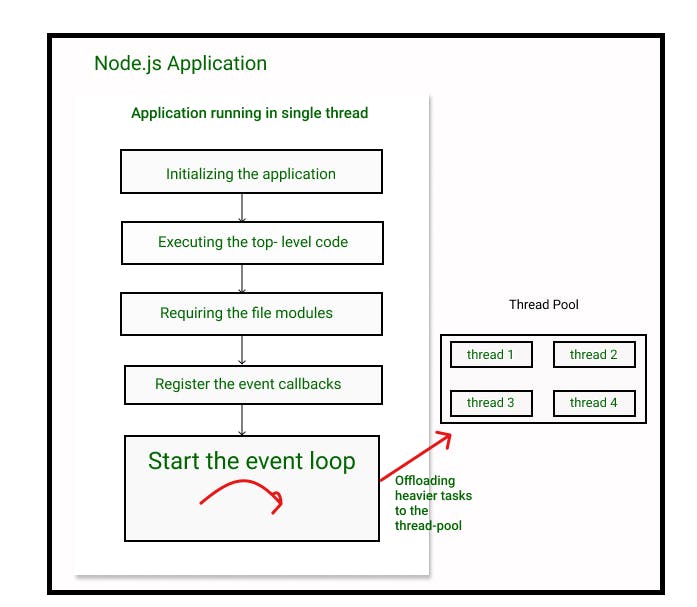 So, as you can see whenever the Node.js application starts in a thread, the first step is to initialize the application and execute the top-level code which as I have said earlier is the only synchronous code that we should have in our application. The next step is to require the modules that we specified in our code (which is normally written at the very top).
The very next step is to register all the event callbacks which are in our code which will then be sent to the event-loop for execution where most of our code in node app is executed. But some times, some tasks are too heavy to be executed in our event-loop by a single thread so those tasks are sent to the thread-pool (provided by libuv) are the 4 extra threads to execute heavier tasks without blocking the main thread. The number of threads can be increased and the user did not have to specify the tasks which have to be off-loaded because event-loop does it all by itself but we can specify the number of threads.
So, I hope you have understood the working till now and its time to read in detail about the event-loops.
So, as you can see whenever the Node.js application starts in a thread, the first step is to initialize the application and execute the top-level code which as I have said earlier is the only synchronous code that we should have in our application. The next step is to require the modules that we specified in our code (which is normally written at the very top).
The very next step is to register all the event callbacks which are in our code which will then be sent to the event-loop for execution where most of our code in node app is executed. But some times, some tasks are too heavy to be executed in our event-loop by a single thread so those tasks are sent to the thread-pool (provided by libuv) are the 4 extra threads to execute heavier tasks without blocking the main thread. The number of threads can be increased and the user did not have to specify the tasks which have to be off-loaded because event-loop does it all by itself but we can specify the number of threads.
So, I hope you have understood the working till now and its time to read in detail about the event-loops.
3) The Event-loop So, you need to remember this point that event-loop is the place where all our asynchronous code is executed. For a moment, why don’t you in the first paragraph and read that again because we will be covering the third point of Node.js which is that, it is based on event-driven architecture. The whole idea behind the event-loop is that it works on this architecture or these 3 steps i.e, 1) Events are emitted These events can emit from any asynchronous function like getting an HTTP request, fileSystem module finished reading the file or a timer has been finished. These events can vary on our code. After that, 2) Event-loop picks them up 3) Callback functions are executed (based on our code) Other than this, event-loop offloads heavier tasks to the thread-pool. Now, you must be wondering if there’s a sequence of these callbacks to run in the event-loop and the answer is Yes. Event-loop does follow a sequence to run the callbacks.
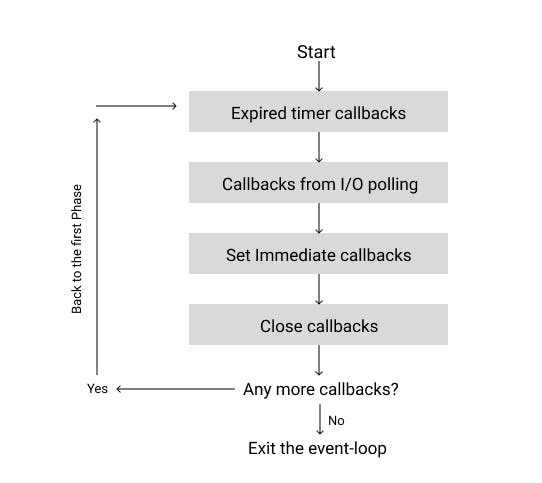
Typically, an event-loop has 4 phases and for each phase, it sets a callback queue that contains callback functions from the emitted event. 1) The first phase is the Expired timeout callbacks, which are the callback functions from setTimeout() function etc.
2) The second phase is the callbacks from I/O polling like an event of reading a file or any HTTP request.
3) The third phase is the callbacks from the setImmediate() function, which are the callback functions that the user wants to execute just after the I/O polling. These type of functions can be specific for some only certain cases.
4) And the last is, Close callbacks which are emitted from events like the closing of the webserver, etc.
An important point is to note here is that all the callbacks available from the certain phase are first executed and only then it goes to the next phase. Also, at the end of the event-loop, it checks whether any other event is still going on and if it is then it returns back to the first phase and so on otherwise the program exits from the event-loop. I think this is enough for you to understand the behind the scenes of Node.js and if you still wish to learn more, you can always look up to the official Node.js documentation.